Getting started with OAuth2 requests to Salesforce
A step by step guide to accessing Salesforce protected API:s
Mission
Okay, you have some resources in Salesforce that is protected by OAuth2 and now you want to access it? Well Sitevision's got you covered. This article assumes you've already read the article OAuth2 integrations made super simple.We'll just add the info that is specific for Salesforce.
When we are done we may perform requests as a user (via the authorization code flow) and as an application (via the JWT Bearer flow).
Salesforce as a specialized OAuth2 Provider is present since Sitevision 8.2.
Preparations
Create a X.509 keypair
We need a X.509 keypair to establish a trust between Sitevision and Salesforce. The keypair is generated with the openssl tool in *nix terminal. Give the private key a password
openssl genrsa -out private_key.pem -aes256
openssl req -x509 -key private_key.pem -out public_key.pem -days lifetime_in_days
Register an OAuth2 app in Salesforce
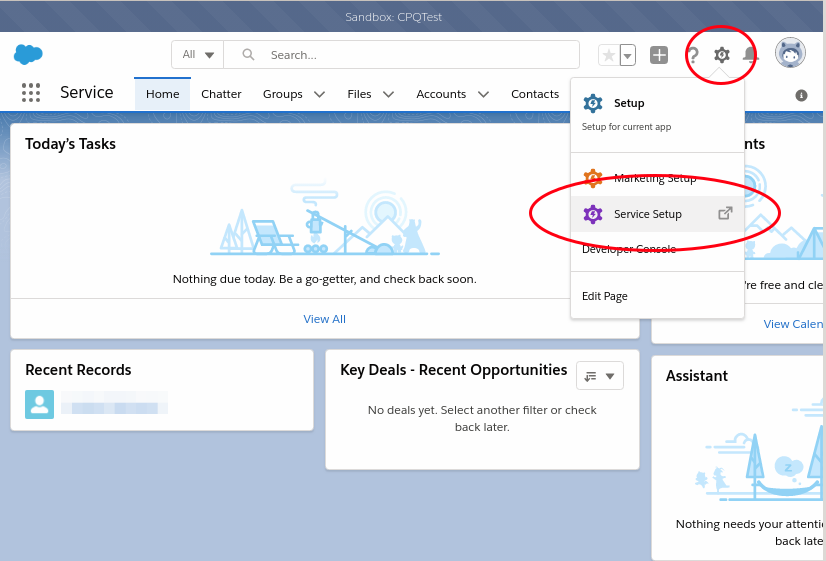
1. Start out in the Lightning experience. Click the cog wheel and choose "Service Setup"

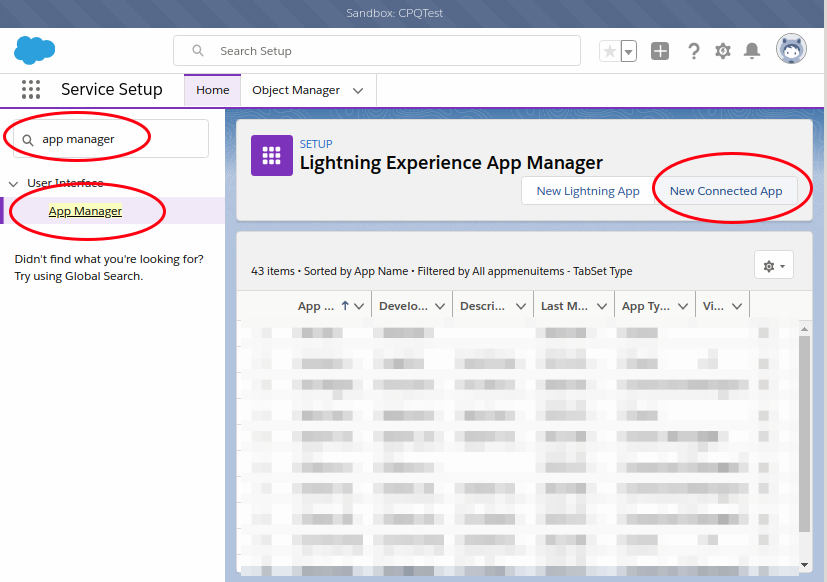
2. Search for and click "App Manager"
3. Click "New Connected App"

4. Enter "Connected App Name", "API Name" and "Contact Email".
5. Add all necessary Callback URL:s. The format is "http(s)://<domain>/oauth2-client/<Identifier>/login" where Identifier is an identifier provided by you in the Sitevision OAuth2 settings panel. Add a Callback URL for each host name you expect visitors from. See "Domain name" and "Secondary Domain names" in the Addresses Panel to get a hint on what hosts might be needed.
Example:
https://domain.com/oauth2-client/salesforce/login
https://www.domain.com/oauth2-client/salesforce/login
https://secondarydomain.com/oauth2-client/salesforce/login
6. Check "Use digital signatures". Upload the private_key.pem created earlier.
7. Add the OAuth2 scopes needed for your requests. Make sure to add "Perform requests on your behalf at any time (refresh_token, offline_access)"
8. Save the app
9. Take notice of the created "Consumer Key" and "Consumer Secret"

Register an OAuth2 Configuration in Sitevision
Add an OAuth2 configuration as described in Add OAuth2 Configuration.
Identifier: Must match the identifier used in the Callback URLs in Salesforce app registration.
Client ID: Use "Consumer Key" value
Client Key: Use "Consumer Secret" value
Salesforce OAuth2 provider settings
Issuer: The address to your Salesforce server. Example: https://example--cpqtest.my.salesforce.com
Audience: Use the authorization server’s URL for the audience value: https://login.salesforce.com, https://test.salesforce.com, or https://site.salesforce.com/customers if implementing for an Experience Cloud site.
Subject: Identifies the user to impersonate when making calls as an application
Private key: The private_key.pem created earlier
Password: The password protecting the private key
Executing API calls
Calling the API as an user is performed exactly as a described in OAuth2 integrations made super simple.
Calling the API as an application assumes that the user identified by "Subject" already has approved your Salesforce app. In the case of a WebApp, just let the user do a regular authorization. When writing a RestApp, where redirection is not as easy you must probably generate a login link through the oauth2 util and ask the user to visit the URL. This will trigger a login and authorize flow.
Do you want to subscribe to News from Sitevision Developer team? Subscribe here!